july/august 2014 skin update

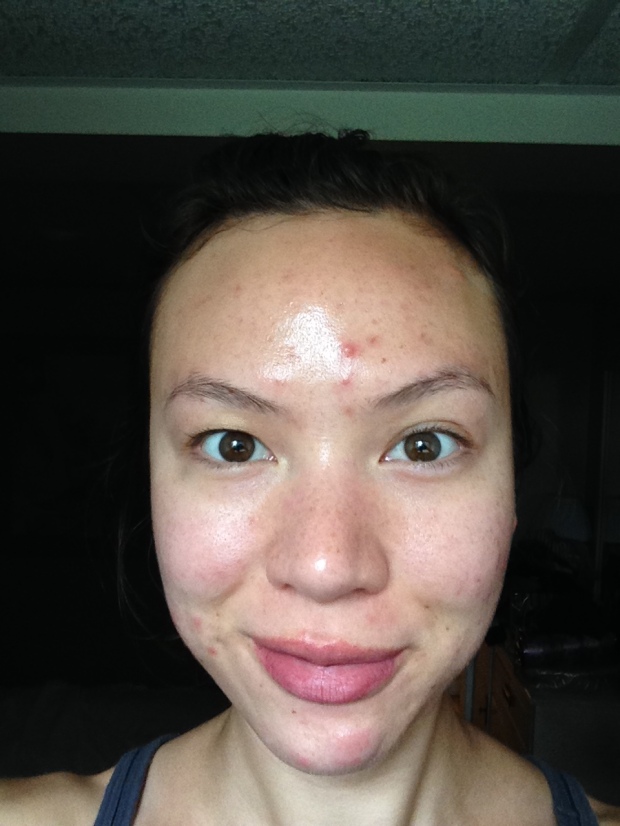
Hi friends! Get ready to look at a bunch of pictures of my goofy face. 

Since my last skin update in April (dang, that’s a long time ago) my skin has been through it’s up and downs. I endured a few weeks of extremely high stress and that definitely took a toll on my skin. I also have included some new skin care products into my daily routine. So let me give you a quick run through on what my skin has been doing and then we’ll be all caught up to the present. 

May. My skin was steadily improving since the last skin update. No major problems. 

June. My skin exploded into about 15 cystic pimples that dwelled under the skin like trolls and caused immense amounts of pain. These cysts were extremely stubborn. I didn’t know what to do about them. I panicked and bought new skin care products which I will review very soon for you! I also moved across the entire country at this time. I was flying back and forth from the West Coast to the East Coast which also stressed out my skin. The dry air in planes wreaks havoc on skin that is already suffering from inflammatory conditions (such as acne). Lastly the climate on the East Coast of Canada is twice as humid as the West Coast. We are talking days that are 100% humidity over here in good ol’ Sydney, NS. The humidity also caused my skin to freak out…major oil production fiasco! All of these changes caused the breakouts but also stalled my ability to heal them. 

July. Armed with new skin care products and knowledge from intense internet research I have started to approach my skin care from a slightly different angle. My skin is beginning to heal. 

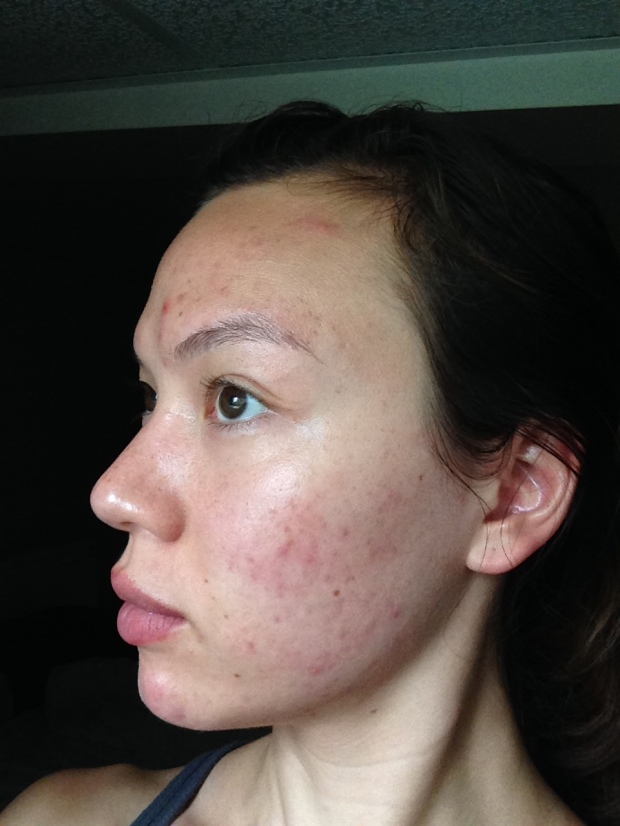
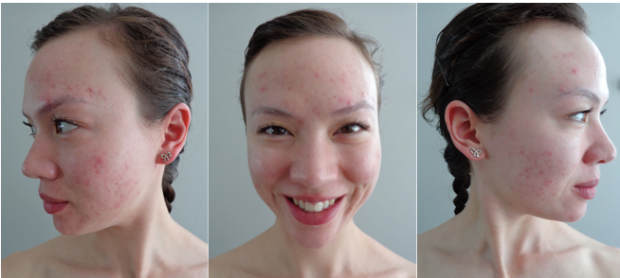
August. Here we are at the present! Here are some pics of how my skin looks like now. 


2014-08-01 13.16.032014-08-01 13.16.07 2014-08-01 13.15.32  

These pictures aren’t the best, nor did I take the time to crop them (sowwy!). However they are pretty true to what I am looking at in the mirror each morning. Apart from the two large pimples on my forehead that magically emerged overnight, the majority of my skin is improving. The hyperpigmentation on my forehead and cheeks is slowly decreasing. They are slightly dusky in colour but have decreased in size immensely. The texture of my skin has changed significantly, in my opinion. I still have a few crater-like scars, but the majority of my skin feels smooth to the touch. 

Thanks for following my acne story. If you are suffering with adult acne please share your story with me in the comments below! I’d love to hear from you! 
Hair today, blonde tomorrow

Hi everyone! For my first post after my extended break from blogging I wanted to share my most recent hair experiment…diy balayage/ombre highlights. Ooooohhhh I know it sounds scary, but since I’ve moved to a new town I have yet to find a salon or hairstylist nearby.

Alas, I resorted to the world of boxed hair colour. It can be really tricky picking out a box of hair dye. There are at least 400 boxes in one aisle, all with smiling women on the front, all of the women are staring at you…it’s intense. Before heading to the drugstore I did some research on at home highlighting kits. Lo and behold L’Oreal recently released a DIY Ombre kit.

images

I chose 060 for medium brown hair. No tricks here. I just followed the directions provided in the kit. There are two sets of directions; one for a subtle effect and one for a dramatic ombre. I followed the directions for a dramatic ombre. The kit comes with a handy little comb that you use to paint the colour onto your hair. I painted the ends of my hair and also some strands around my face for a sun kissed effect. I then waited 15 minutes for the colour to develop. After 15 minutes I went back in with the comb and concentrated more colour on the very ends of my hair and near my face for some extra brightness.

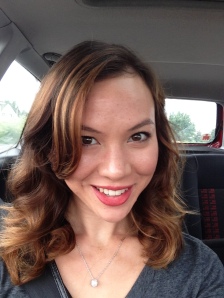
Here is my hair before and after.

2014-05-06 12.17.262014-07-25 19.02.07


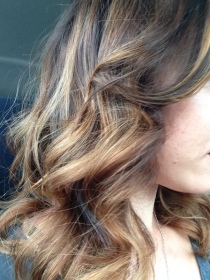
I’m loving the results from this kit! It was easy to do and it didn’t break the bank. The highlights turned out to be a soft caramel colour which I think brightens up my complexion and gives me that sunny, vacation kind of look. Last but not least, my hair doesn’t feel dry or straw-like. I used the conditioning shampoo from the kit and some of my own Biolage conditioner and it feels just as healthy as before I coloured it. All in all I think this is a great little kit for those of you who want to experiment with ombre hair and at-home highlighting.

Here’s one last snap of my hair. What do you guys think!?
Would you ever try DIY highlights?

2014-07-25 19.04.42


I’m not dead…

Hi everybody! As many of you probably never noticed, I haven’t posted anything for about two months. I took an extended break from blogging due to some giant and fantastic plot twists that took place in my life.
I’ve graduated and successfully received my degree in nursing! and then…
I moved across the entire country and started my career as an RN.
Needless to say things have been a little crazy these past two months, but now I’m settled in and ready to start blogging again.
Keep your eyes peeled and your ears perked, I will be doing my very best to be posting regularly from now on!

2014-06-29 11.22.56Hello from Sydney, Nova Scotia! You can find me on Facebook and on Instagram! 

grad/prom makeup

It is that time of year! Graduating from high school is a huge milestone…which means celebrating…which means party worthy makeup! Today I’m going to show you a dramatic eye look that’s perfect for graduation/prom. So let’s get started! First, I’d like to introduce you to my gorgeous cousin who is graduating this year.

DSC00256

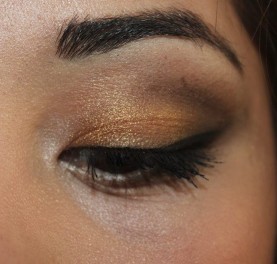
For her upcoming grad I created an eye look that was fun and glamorous. She wanted to play up her eyes so we agreed to go with a gold and black colour scheme to make her peepers pop.

IMG_0589

  1. Start with an eyeshadow primer. This makeup needs to last all night!
  2. Then blend a warm, matte brown just above the crease using windshield wiper motions. This swipe of colour above the crease serves as a gradient colour so that the darker colours on the outer V will appear to blend out smoothly.
  3. Use a matte black eyeshadow to shape out the outer V. Use a light hand and slowly build up the colour. Make sure you blend, blend, blend before you add more colour. We do want the eye makeup to be strong but we don’t want to look like we have a black eye. NOTE: Leave the middle of the lid and the inner corner bare! 
  4. Go back into the crease with a very small amount of the matte brown shade and blend like crazy!
  5. Use a gold, shimmery shadow all across the lid (where you left it bare). Keep the shimmery colour solely on the lid. Do not bring it up into the crease. We want to keep the crease and the outer V as matte as possible.
  6. Highlight the inner corner of the eye with a shimmery, iridescent, white or pale gold eyeshadow.
  7. Line the upper lashline with black liquid liner. I flicked the liner out just slightly.
  8. Line the outer 2/3 of the bottom lashline with the matte black eyeshadow. Keep the shadow as tight the lashline as possible.
  9. Use a small, fluffy brush and the matte brown eyeshadow and blend out the black shadow on the lower lashline.
  10. Coat the upper and lower lashes with two coats of black mascara.
  11. OPTIONAL: Pat some gold glitter on top of the gold, shimmery eyeshadow for some extra glam.
  12. OPTIONAL: Add some false lashes to the upper lashline to up the drama.

Here are a few more pics of the final eye look. I did not add false lashes yet as this was just a run-through. But we will be putting some on for the actual graduation day.

IMG_0591IMG_0590


I hope you liked this eye look! I will be doing an in-depth post on skin perfecting and face makeup for photos soon!

Thanks for checking in with The Beauty Remedy. Please like this post and leave a comment. I’d love to hear from you!


fake and bake

A few days ago I tested out L’oreal Sublime Bronze Luminous Bronzer.

Here’s what L’oreal states on their website about this self tanner:

Go from pale princess to luminous bronze goddess in an instant. With light-reflecting micro-particles, new Sublime Bronze Luminous Bronzer instantly illuminates your skin for a natural-looking, long-lasting bronze glow. Enriched with fast-action self tanners and Vitamin E, a powerful anti-oxidant, this quick-drying lotion replenishes skin as your sunless tan develops. A beautifully radiant sun-kissed look, streak-free, sun-free. All with a new deliciously fresh summer scent. Now, summer never has to end.

Sk9_12

The good. This stuff is super easy to apply! It’s a bronze coloured gel that applies smoothly. It glides over the skin and you have enough time to really work it into the skin to ensure no streaks or blotches. It takes less that 10 minutes to completely absorb into your skin so you don’t have to stand around naked in your room for an hour before you can put your clothes on. This self tanner definitely delivers on colour. I ended up with a lovely glowing, bronze colour. No streaks, no blotches, and I did end up looking like I belonged on Jersey Shore.

The bad. This stuff is glitter-tastic! BEWARE! If you usually apply self tanner in the morning and let your tan develop throughout the day consider yourself warned. You will be covered in specks of glitter. I also didn’t think that this product did not “instantly illuminate” my skin. I looked sparkly, but there was no instant bronzy, glow. Lastly, it smells like a beachy, men’s cologne. It’s not a terrible scent but it definitely wasn’t a “deliciously fresh summer scent”.

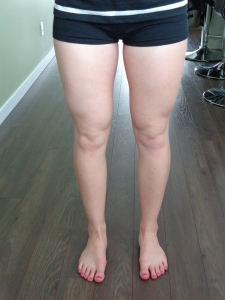
The results. Here are some pictures I took after applying this product to my legs. I took the pictures 24 hours apart to really give this self-tanner enough time to develop.

2014-05-14 11.19.43 2014-05-15 12.10.43


If your interested in a budget friendly self-tanner I would definitely recommend this one. I loved the results. I look like I’ve spent a few days in the sun without the damage of UV rays. I’ll be using this stuff all summer and probably during the fall and winter for special events.

What are some of your favourite self-tanning products or glow-boosting tips? Let me know in the comments!

cleanse and moisturize

Hi everyone! Today I’m going to be talking about two products that I have enjoyed using. These products were given to me by a friend, Jeanette Weeks…click on her name for more information about her! 🙂

The first product is the Mary Kay Clear Proof Clarifying Cleansing Gel. Say that three times fast…
On the Mary Kay website you will find this run down of the product:

  • Gently removes dirt, oil and complexion-dulling impurities.
  • Deep cleanses skin to penetrate and clear pores.
  • Helps reduce and control shine, leaving skin with a beautiful matte finish.
  • Helps maintain a clear complexion.
  • Does not strip skin of moisture.
  • Leaves skin feeling smooth and fresh.
  • Rinses clean with no residue.

It’s also fragrance-free, oil-free, non-comedogenic and suitable for sensitive skin.

img-thing

This cleanser gets it done! It’s a clear gel that foams into a nice lather. It doesn’t have any distinct smell as it is fragrance free, which I love! FRAGRANCE DOES NOT EQUAL SKINCARE!!! So thank-you Mary Kay for leaving irritating fragrances out of a cleanser designed for already irritated skin…applause! I find that this cleanser effectively removes excess oil and dirt from my skin. I have tested it by using a toner on a white cotton pad after cleansing. Nothing shows up on the cotton pad! Yay! After using this cleanser my skin feels clean and soft. I don’t feel dried out at all. The only claim that Mary Kay makes about this cleanser that I cannot vouch for is whether it reduces and controls shine. My skin will grease through the best mattifying products on the market. About 1 hour after washing my face I can see the oil start to seep through my pores, but that’s okay because I have always been this way.

The second product I want to talk about is from the same line. It’s the Clear Proof Oil Free Moisturizer for Acne Prone Skin. What is with these hella-long names!? Aha! Anyways, here’s what Mary Kay says about this moisturizer:

  • Replenishes moisture to provide balanced hydration.
  • Is lightweight and quick-absorbing with no oily or greasy feel.
  • Does not clog pores.
  • Helps control excess oil, leaving skin with a beautiful matte finish.
  • Feels soothing to irritated skin.
  • Improves the appearance of skin’s tone.
  • Helps skin feel healthier, nourished and smooth.
  • Helps maintain skin’s moisture.

It also is non-comedogenic, suitable for sensitive and acne-prone skin, and clinically tested for skin irritancy and allergy.

mary-kay-clear-proof-oil-free-moisturizer-for-acne-prone-skin-z1

I really like this moisturizer! It’s a gel-cream texture that feels absolutely amazing on my greasy face. I find that this moisturizer absorbs quite quickly and it doesn’t leave any sticky or oily-looking residue on my skin. I don’t think I have been using this product long enough to make a conclusive statement as to whether it has altered or improved the texture or appearance of my skin but after a few more weeks I’ll let you guys know. I have been rolling through different moisturizers for a while and none of them have really impressed me, but this one is definitely impressive. I will enjoy using every last drop of it!

Thanks for reading my review! If you’re interested in trying these products or any other Mary Kay products click here!


joe fresh liquid lipstick in baie savauge


Joe Fresh (the clothing/accessories/makeup line from Superstore) has recently released a line of liquid lipsticks for their spring/summer collection. Here’s to you Joe Fresh, you totally nailed it!

I picked up two shades Grapefruit and Baie Savauge…obviously I want to talk about Baie Savauge. This colour! Please appreciate it for a few minutes…
12224293536_6604989c5b_zI have been searching high and low for “Radiant Orchid” products, i.e. Pantone Colour of the Year for 2014. On Sephora’s website they have pages of suggestions. However, what about us poor people who don’t want to spend $32 on a lipstick that will no longer be “the colour of the year” come 2015? Enter Joe Fresh liquid lipstick in Baie Savauge. The punchier, more vibrant, budget friendly, Radiant Orchid lipstick.

Apart from the amazing colour, this product has an excellent formulation. It goes on creamy and smooth, sets to a semi-matte finish, and wears beautifully for 5+ hours. What more can you ask for in an $8 drugstore lipstick?

As you can see from the swatch, this stuff has amaze-tastic pigmentation.

2014-05-07 13.09.12

You only need the tiniest amount to give yourself covetable colour. For those that don’t want a full on power pout, apply and blot! You will be left with the most beautiful orchid stained lips. This liquid lipstick also makes a beautiful cheek stain. But be careful when you apply! Through my rigorous experimentation I have decided the best way to apply this product as a cheek stain is to dot some on the back of your hand and then pick up a tiny amount on a small duo fibre brush like this one. Blot the brush once or twice to remove excess product and then blend whats left onto the apples of your cheeks. Then admire your fresh flush in the mirror. As a cheek stain this product looks very similar to Benefits Lolitint. You are welcome!

2014-05-07 13.07.25

As a bonus, the blue undertones of this colour will also create a whitening effect on your teeth! It just keeps getting better! and I just can’t get enough!

What are your “Radiant Orchid” beauty product picks? Please leave a comment so we can talk beauty!


april 2014 skin update

Screenshot 2014-05-02 15.37.58


Hi friends! I’m a few days late on my April skin update, but I did take these pictures on the very last day of April, so technically it still counts.

As you can see my skin has improved even more over this past month. You can check out my March skin update here to compare.

My cheeks have maybe 3 pimples in total. There is still hyperpigmentation and redness present, but I feel like each of these problems has improved since my last update. Hyperpigmentation takes a really long time to resolve so I am trying to be as patient as I can. As for the redness, I am trying to be as gentle with my skin as possible in order to reduce any irritation. I’m not using any harsh cleansers or soap on my face, I moisturize morning and night, and I’m using a buttload of SPF on my face…that’s right, a buttload. Since the sun has started peaking out I have upped it to an SPF of 30 or greater every day.

My forehead is going a little cray…I think I’m experiencing a bit of a PMS/hormonal breakout because I have 4 giant pimples on my head. They are the deep, painful type. Not quite a cyst, but definitely cyst-like. I think it’s probably going to take two or more weeks for these suckers to vacate the premises…ugh! Due to the fact that my forehead is acting up I’ve added some benzoyl peroxide back into my skin care routine. I’m only using a 2.5% concentration, and I’m only putting it on my forehead. I use a small dot of the Neutrogena On-The-Spot Acne Treatment and then spread it all over my forehead. Then I put my nighttime moisturizer on.

Here’s a lovely picture of my forehead…Please ask small children to leave the room before scrolling down.
DSC00417Aaaaaahhhhh!! TOO CLOSE!!
My sincerest apologies.

I will be posting a full skin care routine that includes all of the products I use. For those that are wondering, I am still using my Clarisonic Mia 2 and the Arbonne Intelligence Genius.

Thanks for checking in with The Beauty Remedy! Please leave any comments or questions below, I love hearing from you! 🙂


Grow a pair…of eyebrows

sev-bushy-brows-lily-collins-lgn sev-bushy-brows-cara-delevigne-lgn kim k brow   camilla belle brow

Lily Collins, Cara Delevingne, Kim Kardashian and Camilla Belle. These women rock a serious brow.

Bold brows have been popular for some time now. Some women are blessed with them, some women are like me and wonder where their eyebrows went every time they snap a selfie.

Operation “Grow a pair…of eyebrows” is born out of sheer envy of the brows shown above. I am determined to grow some serious eyebrows. However, I don’t want to be walking around with unruly, unkempt, unshaped brows for the next month. So this is for all you ladies out there that have been wanting to regrow those brows but refuse to have weird, unshapely caterpillars living above their eyes. Here are my secrets to growing out your brows without looking like this…

oscar the grouch


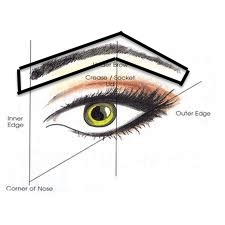
Alright ladies let’s get started! Pull out the tweezers…wait I thought we were growing our brows out!? We are, but we don’t want to be joining the ranks of good ol’ Oscar while we strive for Delevingne-esque arches. So, like I said, pull out those tweezers and then study this picture:

imagesCAYVXDFV copy

We’ve seen this diagram a million and one times. Which is good, because it’s a good diagram. It tells you exactly where your brow should start, arch and then end. But it doesn’t help you determine how to preserve thickness in your brows. I have updated this timeless diagram with my own additions to help us grow out our brows:

imagesCAYVXDFVIn order to grow out bold, shapely brows we need to preserve as many hairs as we can, but we also need to get rid of hairs that don’t NEED to be there. So we are only going to be plucking stray hairs that are more than 0.5 cm away from our brows. Any hair that falls within 0.5 cm is potentially part of our new brow shape, so we want to save them.

We CAN grow our brows without sporting a dreaded unibrow, and we WILL.

I will be updating you with my brow growth progress here and on Instagram. Thanks for checking out this post! I’d love it if you left a comment!


Body Beauty

You cleanse, exfoliate, treat, moisturize and protect your face everyday, sometimes twice a day.Well your body is jealous and it wants some attention too. If you are guilty of neglecting the skin south of your collarbones now is the time to change that. Spring is in the air and the hemlines are coming up and the necklines are going down, so let’s get all of your skin glowing like this…

spot-the-skin-cancer-400x400

Cleanse. I assume that most of us use some sort of soap when we shower or bathe…If you don’t then maybe you should start. Soap is good thing. Use it. Use whatever type of soap that makes you happy. Bar soap, body washes, unscented, scented…blah blah blah. I buy whatever is on sale and smells good, so I don’t have any tried and true recommendations for you.

Exfoliate. Here is some magic. Use that soap with an exfoliating mitt or a loofah. Get rid of all that flaky skin that hangs out around your elbows, knees and ankles. Exfoliating the skin on your body can help heal and prevent bacne or chestne (is that a word?) and it can also help with those annoying bumps that live on the backs of your arms (you know what I’m talking about). Just like exfoliating your face leaves you all soft and glowy, the same will happen for your body. Who doesn’t want some extra glow?

Treat. This tip is for those of us that have body acne, scars, or stretch marks. I am blessed with all of these things. Le sigh. For body acne I use tea tree oil. Just a few drops smeared over the affected area once or twice a day will do the trick. I’ll be doing a post on the wonders of tea tree oil sometime soon! For scars and stretch marks I have used bio oil, coconut oil, jojoba oil, vitamin E cream, regular moisturizers, etc, etc. For fresh cuts and scrapes that you know are going to leave a scar I would suggest coconut oil. I had a really terrible spot of road rash a few years back from falling off a bike. I started putting coconut oil on it immediately. I applied the oil everyday at least twice. After about a month of use you could barely tell that I had slid 4 feet across some gravel. Very impressive. I have yet to find a product that helps with old scars so please leave a comment if you have any product suggestions or tips and tricks! For stretch marks I find that a regular regimen of exfoliating and moisturizing has lessened the appearance of any stretch marks on my body.

Moisturize. Go out to the closest Costco, buy an economy size barrel of body lotion, and apply liberally! Everytime you cleanse and exfoliate your body you should follow up with a moisturizer. This one is my all time fave, I have been using it forever. Moisturizing your skin will help keep it in tip top shape. You will glow. You will be less itchy. Healthy moisturized skin is less susceptible to irritation from your environment…that means less unexplainable rashes. Moisturizing is not just about beauty, it is about your health. HA! No but seriously

Protect. If you are not won over yet by this impressive blog post about the importance of treating the skin on your body just as well as your treat the skin on your face then please, please, please start pay attention to this one thing. PUT ON SUNSCREEN. That is all. This is probably more important than any of the aforementioned tips and tricks (except maybe soap). Sunscreen will not only keep your skin looking younger, longer, it will protect you from sunburns, sun damage and skin cancer. Melanoma is a serious thing and it is completely preventable with a little SPF.

Thanks for dropping in! Please leave a comment with your favourite body beauty tips, tricks or product recommendations. I’d love to hear from you!